

Like a saddle, your choice of touring handlebars is highly personal.
There are lots of different handlebar designs available from traditional road bike drop bars, to mountain bike flat bars, and even touring-specific designs such as butterfly and alt handlebars.
This article takes a closer look at the key characteristics of touring handlebars, and the pros and cons of each design.
Hand Positioning

Changing your wrist position regularly will relieve stress points on your hands and will change the muscles you’re using in your arms, shoulders and back. By sharing the load, your body will be less fatigued at the end of the day.
Some cyclists are affected by Carpal Tunnel Syndrome (CTS). CTS is pressure on the median nerve – the nerve in the wrist that supplies feeling and movement to parts of the hand. It can lead to numbness, tingling, weakness, or muscle damage in the hand and fingers. If you tour with a bar that has limited positions and is affected by any of the above symptoms, a handlebar change may make a big difference.
Body Posture and Handlebar Height
Your body posture on a bike is mostly due to your bike’s frame size – a handlebar alone will not set you up for all-day comfort. Your bike frame needs to be a size that isn’t too stretched out and should be high enough in the front to keep your neck and back in check.
The ‘ideal’ position depends on a lot of factors: your flexibility, your body proportions, your fitness levels, any injuries you’ve sustained, your saddle choice, and any medical conditions you may have.
I recommend the lowest position that you feel comfortable riding all-day in, for two reasons:
– Battling headwinds is easier in a lower and more aerodynamic position; and,
– You can spread your body weight more evenly between your saddle and handlebars in a lower position.
For beginner tourers, a good start is to have the top of your handlebar an inch or two (3-5cm) above your saddle height. You can then drop the height of your handlebar until you are comfortable. With time, more flexible cyclists (especially those with road biking experience) can ride all day with handlebars around the same level or a touch lower than their saddle. Less flexible cyclists or those seeking an upright position will do well with their handlebars considerably higher than their saddle.
Are you a Beginner?
People who are not confident riding bicycles (especially ones loaded with heavy panniers and in traffic) should be warned that drop bars make a bicycle more difficult to handle when compared to the same bike with trekking or flat handlebars. This is due to the fact that drop bars have less steering leverage (to overcome any front luggage) along with less accessibility to the brake levers.
If you are inexperienced, I generally recommend starting out with a flat, butterfly or alt handlebar first.
Bike Sizing and Handlebars
The frame size that you choose with a drop handlebar will be different to a bike using a trekking or flat handlebar. On a road handlebar, you are fitted most comfortably in the ‘hood’ position at the top of the brake lever. This hood position results in a longer overall reach by approximately 50mm, compared to a flat handlebar.
Bike manufacturers build the reach of their bikes to suit certain handlebars. They increase the length of the top tube by about 50mm when designed around a flat handlebar. That doesn’t mean you can’t run a road handlebar on a bike designed for a flat handlebar – it just means that you may need to go a size or two down to get the appropriate reach for you.
All About Drop Bars
The classic touring handlebar option for its multiple hand positions, both low and high, as well as near and far. It’s best suited to experienced cyclists.
Why use a drop bar:
– They offer multiple hand positions
– They have a high and low body position
– They’re more aerodynamic in headwinds or for high-speed riding
– They’re narrow enough to squeeze through traffic
– They can be paired with ‘cross’ levers so that you have two sets of brake levers
Why to NOT use a drop bar:
– They’re not as stable-feeling for inexperienced cyclists given their narrow width
– They’re not as wide as any of the other bars for slow speed or out-of-the-saddle stability
– There’s limited access to brake levers
– There’s less handlebar space for accessories
– They’re harder to get used to
– They’re harder to mount Rohloff shifters on (click HERE to see a compilation of ways to get around it)
– Bartape must be used, which can be rather easy to tear
All About Butterfly/Trekking Bars

The most popular handlebar option for round-the-world cyclists because it offers lots of hand positions and is wider than road handlebars.
Why use a butterfly handlebar:
– They offer lots of different hand positions.
– They’re narrow, making them great for splitting traffic.
– They have great access to the brake levers.
– You can easily mount mountain bike gear shifters and brake levers.
– They’re excellent for beginner bicycle tourers.
Why to NOT use a butterfly handlebar:
– They’re not as wide as flat bars.
– Bar tape or foam must be used, which can be rather easy to tear.
All About Flat Handlebars

Flat handlebars can be great if the right handlebar is used. I generally recommend bars with over 10 degrees of sweep for a more natural hand position, as well as the use of bar ends for a secondary hand position.
Why use a flat handlebar:
– They have greater control over the bike thanks to additional steering leverage.
– Lots of space for accessories.
– Changing the grips is a 2-minute job.
– They fit mountain bike gear shifters and brake levers (much easier cable changes)
– They’re ideal for beginner bike tourers.
Why to NOT use a flat handlebar:
– They offer fewer hand positions.
– They can be harder to get between traffic due to their width.
Alt Handlebars

Alt handlebars are my favourite handlebar design – so much so, I designed my own!
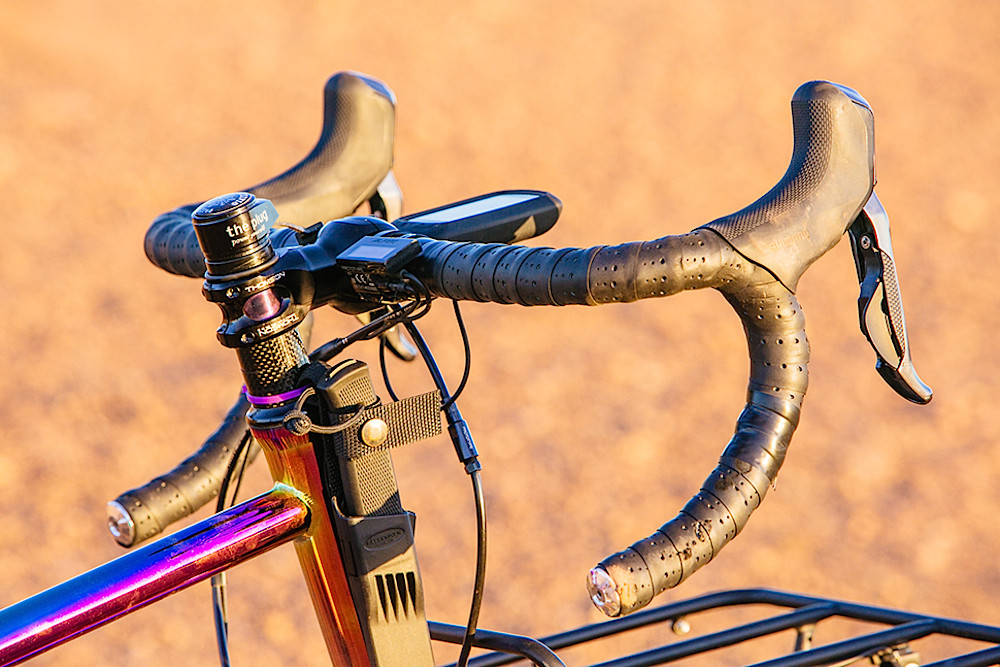
With the KOGA Denham Bar, you a wide handlebar that offers excellent bike control, and you also get the equivalent ‘hoods’ and ‘tops’ positions from a drop bar for both aerodynamics and comfort. There are three distinct hand positions, but I actually use five different spots, which you can see in this video HERE. They are compatible with standard mountain bike shifters and brake levers.
You can everything there is to know about the Denham Bar design HERE.
Summary
– A bicycle touring handlebar should offer multiple hand positions to keep you comfortable and reduce the risk of Carpal Tunnel Syndrome. It’s handy to be able to change the stress points on your hands, arms, shoulders, and back as you ride.
– If you’re a beginner or don’t feel 100% comfortable riding a bike yet, avoid narrow bars as they’re not as confidence-inspiring as wider options.
– Drop handlebars offer both low and high, as well as near and far body positioning – making them great in the wind or for faster riding.
– Trekking handlebars are still quite popular for round-the-world cyclists because they offer good leverage, MTB shifter/brake compatibility, and multiple hand positions.
– Flat handlebars are the most limiting in terms of hand placement, but with some bar-ends can be great to tour with. The advantages include control at low speeds, leverage for climbing, and space for accessories.
– Alt handlebars are my personal pick for a touring handlebar as they offer the best of all worlds. Check out my list of alt bar options HERE.


Following on from my questions on the belt drive, I’d like to ask about using drop bars with Rohloff. I have been pondering this for a while, but the idea of having to move my hands from the hoods/drops every time I want to change gear sounds annoying so I’ve been considering the Alfine 11. Maybe it’s not that bad but I would anyway like to have interrupter levers on the tops for negotiating traffic etc which would partially solve this problem. During initial discussions with one of the manufacturers that have made my shortlist, though, they didn’t think that interrupter levers are long enough to clear the Giles Berthoud/Co-Motion drop bar shifters and, sure enough, all of the few interrupter levers I can find do look rather stubby.
I see you too like using cross levers with drops, but I also see you have gone for a separate shifter rather than a twist shifter on your drop bars. Have you any experience with the GB/CM shifter and cross levers? Do you think it’s a workable option? Do you know of any interrupter levers that would be long enough to meet my requirements?
I have not used the GB or Co-Motion shifters. Rohloff hubs sometimes have ‘sticky’ gears which require a good grip to change gear – as neat as those shifters are, I feel that metal shifters will not work well as twist shifters, ESPECIALLY in the wet but also with gloves. The stock Rohloff shifter is as good as it gets – smooth changing, weatherproof and grippy.
Personally, I don’t know if a shifter on the top of the drop bar is a better place than at the end of the drop, or under the stem like we have it. I spend most of my time in the hoods, so I’d have to move my hands to that location anyway. I don’t have any issue with moving my hand to change gear, I’m definitely used to it now!
I’d hazard a guess and say that no cross-top lever will work with the above mentioned shifters. If you are still keen on having the shifter located on the top of the bar, I’d suggest just running one cross-top lever. You’ll probably only use these levers to wipe off a bit of speed, keeping the hood position for your heavier braking.
Moving your hands is something you get used to very quickly. Bar end shifters certainly minimize the movement though.
My butterfly bars are a good 3 inches below my seat and have eliminated my flat bar position which seemed just about right. I can’t get the height I want and the reach is a little too far or too close. It’s not horrible but not ideal. Any thoughts on getting more height on the trekking bars or do I need to go back to my flat bars with bar ends?
Hi Jeff. It sounds like your flat handlebars were not too hot, not too cold – but just right! That said, by increasing the height of your handlebars, you’ll reduce the overall reach and may be able to get to the end of the butterfly bars. You could then tilt the handlebars back so that the closer section is lower (and therefore further) and the further section is higher (and therefore closer). Refer to the picture above to see what I mean. Check out the Satori Heads Up ( http://www.satoribike.com/index.php ) to have a play with a taller front end. Alee